In this article, we cover how to assign users manually and automatically to a Sharing.
Now that you have had the time to play with creating Modules, Learning paths and Sharings, it is time for you to share it with your users! Since there is more than one way to do so, we have made this short article that can help you through the process.
Assign users manually to a sharing
Follow the step-by-step guide here if you're going to assign users manually to a Sharing. If you'd like to auto-assign users using the rules.
-
Go to Sharing in the side menu.
-
Choose the Sharing you want to assign users to and click it! (Want to learn how to create a Sharing?
-
Click on Assign users in the top right corner.
-
Click on Add users.
-
Use the search bar to search for users you want to assign the Sharing (you can search for Name, Department, Job profile, and Permission type).
-
Select the users you want to add.
-
Click +Add and the user is now assigned to the Sharing.
Assign users automatically to a Sharing
Sharings can also be automated, which means that you will not have to manually assign users to your learning content (Learning paths and Modules). You do that by setting up rules that automatically assign groups/employees that match your predefined criteria. Let's take a closer look at that.
What is a “rule”?
Rules are a way to automate actions you usually would have to do manually. This means you can auto-assign learning content to users based on their Job profile, Department, or Permission type.
How to set up a rule?
To set up a rule, navigate to Assign users in the Sharing you want to automate.
-
Click on Create rule.
-
Choose criteria for the rule (Job profile, Departments, or Permission type)
-
Select the Job profiles, Departments, and/or Permission types to define who should be assigned to the Sharing.

Here's an example
You want to automatically assign all users in the finance department to a Sharing.
-
Select Departments after you have created a new rule.
-
Click the Departments dropdown menu.
-
Tick off the box with the finance department.
-
Activate the rule by clicking the slide button (just below the "Create rule" button).
-
The rule is now active, and all users within the Finance department will be added to the Sharing automatically.
Multiple rules
You can add as many rules as you would like. Simply create a new rule and follow the above steps. This is beneficial if you want to share learning content with a department and a job profile or permission type.
“Add” rule
When adding a rule to your Sharing, you have the option to narrow down your target group.
Example: You want to add users from the finance department, but only users with the Permission type “User”.
-
Create a new rule.
-
Select Departments.
-
Click the Departments dropdown menu.
-
Tick off the box Finance.
-
Click the “+” button next to the Departments drop-down menu.
-
Select Permission type.
-
Click the Permission type dropdown menu.
-
Tick off the box User.
-
Click Apply.
-
Activate the rule by clicking the slide button (just below the "Create rule” button).
-
The rule is now active, and only users within the finance department that have the Permission type “User” will be added to the Sharing.
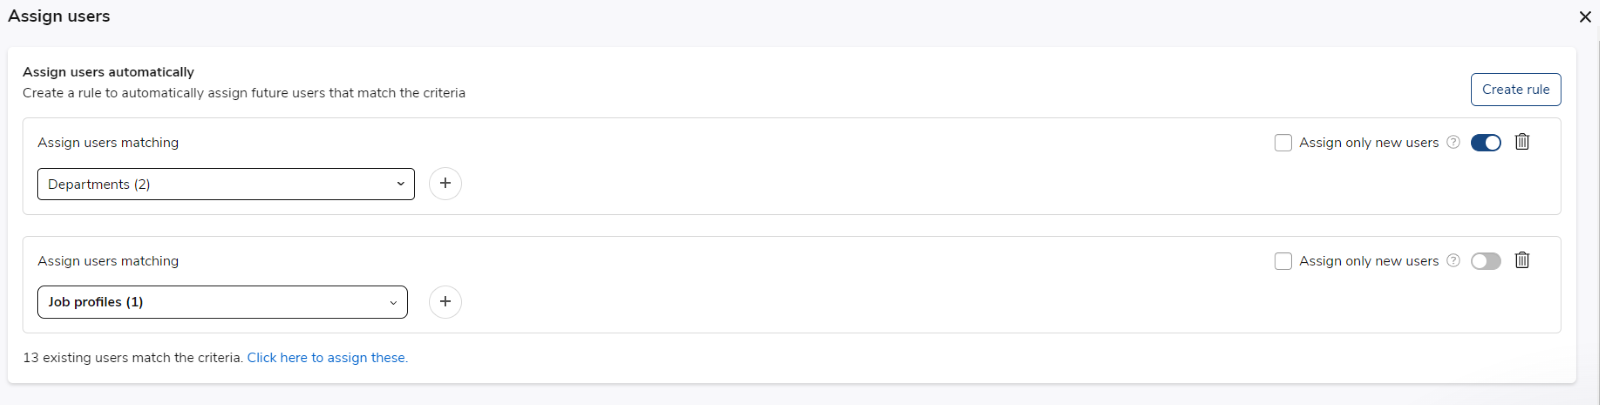
The “Assign only new users” function
The quick reader has noticed that there is a function that allows you to only assign Sharings to new users. If the box is ticked off, only new users (in the future) who are added to the Department, Job profile, or Permission type will be assigned to the Sharing. Users already in the predefined criteria will not be assigned.

Activate the rule
And always remember to activate the rule using the slide button just below the “Create rule” button.
The first time you create a rule and activate it, you need to be mindful of the blue text right underneath the rule that says, "Click here to assign these". Go here and add all the users with matching criteria by ticking the top box and then clicking +Add. When this is done, all users that match are added to the sharing, and users with matching criteria in the future will also be added.
For more information, contact our support🚀